Turn on suggestions
Auto-suggest helps you quickly narrow down your search results by suggesting possible matches as you type.
Showing results for
Voyager 2091 Wireless Router - Setup Guide
Voyager 2091 Wireless Router - Setup Guide
Topic Options
- Subscribe to RSS Feed
- Mark as New
- Mark as Read
- Bookmark
- Subscribe
- Printer Friendly Page
- Report to Moderator
- Plusnet Community
- :
- Library
- :
- Voyager 2091 Wireless Router - Setup Guide
Voyager 2091 Wireless Router - Setup Guide
15-05-2009
11:47 PM
 This guide shows you how to get connected with the BT Voyager 2091 router. Although we provide Windows setup details, the Voyager 2091 is compatible with Apple Macs.
Note: There are no USB drivers for Apple Macs yet, you should use the Ethernet or wireless connection instead.
- Before you start
- Setting up your hardware
- Setting up your broadband connection using Ethernet
- Setting up your broadband connection using USB
- Setting up your broadband connection using wireless
- Troubleshooting
- Advanced settings
- Changing username and password
Downloads
1. Before you start
- Make sure your broadband account has been activated and that you have your broadband
username and password to hand. - The Voyager 2091 can support different ways of connecting your computer;
Ethernet, USB and wireless. Read the USB installation section for
help getting your router setup using this method. - If you want to use the wireless connection, you will need to have a wireless
adapter installed in your computer and ready for use. - To make a wireless connection to your router you will need the security
key, located on a pink label on the bottom of your router.
[Top]
2. Setting up your hardware
- 1. Plug one of the provided microfilters into your telephone socket. There should be a microfilter fitted to each extension on your line that is used by a telephony device (telephones, Sky box connections, fax machines, house alarms etc). For more information see our Guide To Fitting Microfilters.2. Plug the grey telephone cable into your microfilter socket marked DSL.
3. Plug the other end of the grey telephone cable into the DSL socket on the back of the router.
4. Plug the power adapter into an active mains socket.
5. Plug the other end of the power adapter into the back of the router.
6. Switch the router on by pressing the power button at the back of the router. The power light on the front will turn green.
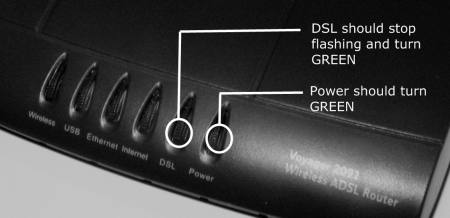 |
|---|
Power and DSL connection lights |
[Top]
3. Setting up your broadband connection using Ethernet
Follow this section if you want to connect your router using an Ethernet network cable. You should also use these instructions if you have difficulties setting up using the wireless option. If you intend to use the wireless connection see the next section - Setting up your broadband connection using wireless.
- 1. Connect the yellow Ethernet cable to your router. Use the Ethernet port.
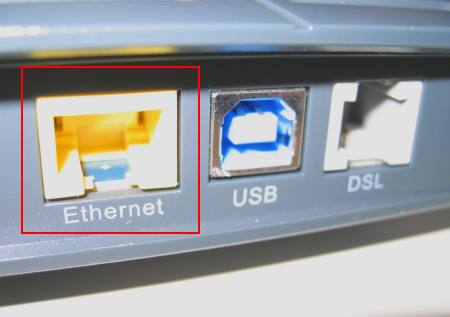 |
|---|
Ethernet port |
3. Open a browser program such as Internet Explorer.
4. On the address line type http://voyager.home or if this doesn't work, try the IP address http://192.168.1.1
5. The router's Configuration Manager screen will appear.
6. The broadband settings should already be correct. See our Broadband Connection Settings page for the specific details.
7. Type in your full broadband username (including the @ symbol and the 'realm' details) and your account password. Your Broadband Username is provided in the email that we send you when your service is activated. You can also confirm it by checking our Member Centre for your Connection Settings.
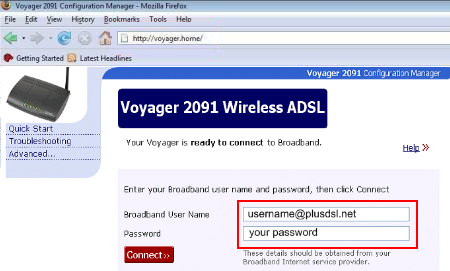 |
|---|
Broadband username and password |
Congratulations, your router will now connect to your broadband service. The Internet light on the front of the router will turn solid green to confirm that you have connected successfully. See the troubleshooter section if this doesn't happen within a few minutes.
[Top]
4. Setting up your broadband connection using USB (Windows Only)
Follow this section if you want to connect your router using a USB cable. Connecting your computer to the router using USB requires an available USB port. Only one Windows computer can be directly connected to the router using this method.
- 1. Download the PC USB Driver File to your hard drive. Double click on the install file and save the driver files onto your hard drive. Make a note of where these files have been saved as you will need to use them in step 3.2. Shut your PC down and connect your router to the PC using the blue USB cable.
3. Restart your PC. You may be shown a 'Add Hardware Wizard' prompt, if so you will need to select recommended default settings. If you are prompted to identify where to search for drivers, select to browse the location of the files that were saved in Step 1.
4. After the driver installs click Close to complete the driver installation. The Setup Wizard will resume when your PC has been shutdown and restarted.
5. Once your PC has been restarted, your Voyager 2091 router will connect using the USB cable. You can proceed with the setup of your router from step 3 on the Ethernet setup section.
[Top]
5. Setting up your broadband connection using wireless
The Voyager 2091 supports wireless "WiFi" access using a computer or device that has a wireless adapter.
To connect your computer using a wireless link, you will first need to ensure that your wireless access card is properly installed in your computer. You should also ensure that your router has been setup, is plugged in and powered up.
- 1. Computers running a version of Windows show an icon in the task tray (found in the bottom right-hand corner of the screen), to confirm that a wireless adapter is installed. Run your mouse over the network icon and right-click with the mouse to bring up a menu.
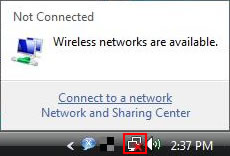 |
|---|
Wireless network connection |
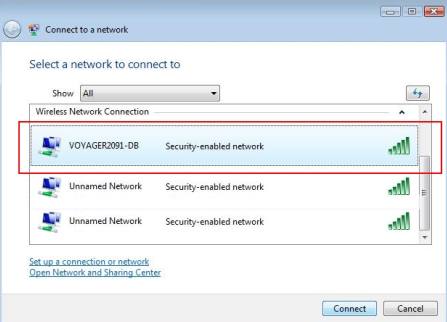 |
|---|
Choose the wireless network connection |
 |
|---|
WEP security key |
Congratulations, your router will now connect to your broadband service. The broadband light on the front of the router will turn solid green to confirm that you have connected successfully. See the troubleshooter section if this doesn't happen within a few minutes.
[Top]
6.Troubleshooting
The following tables explain what the various status lights say about your connection status:
| Power light | |
|---|---|
| Off | No Power |
| Solid green | Power on, device in operation |
| Solid red | Power on, device is self-testing |
| Flashing red | Power on, firmware update in progress |
Ethernet USB | |
| Off | No device connected or switched off |
| Flashing green | Network device connected |
Internet (access to Internet service) | |
| Off | Not connected to the Internet |
| Green | Connected to the Internet |
DSL (broadband connection) | |
| Off | No connection or device switched off |
| Flashing orange | Attempting to connect |
| Solid green | Connected successfully |
Wireless | |
| Off | Wireless disabled* or faulty |
| On | Wireless on |
You can find more troubleshooting information by going to your router's Configuration Manager page and clicking Troubleshooting.
[Top]
7. Advanced settings
The advanced settings of your router give you access to a wide range of settings relating to networking and wireless security. Access to these settings are restricted by a username and password - these are both set to 'admin' by default.
[Top]
8. Changing username and password
The Voyager 2091 is set up to automatically connect to the Internet whenever it detects that the connection has been dropped. If for whatever reason you need to change your username and password, you may need to use the Advanced settings. Read how - Voyager 2091 Wireless Router - Changing Username and Password.
[Top]
Related articles
- Using a BT Homehub 3 or 2 on Plusnet ADSL or FTTC
- Controlling wireless access on the TG582n
- Xbox 360: How to set up a wireless connection on older dashboard versions
- How to connect to your wireless network - Amazon Kindle
- Fibre help - Setting up a PPPoE Dialler for windows XP
- How to change the default DNS Servers in a Thomson Router