If you've got an Apple Mac computer running OS X, you can use these instructions to help set up your Plusnet broadband service using the Voyager 2110 Wireless Broadband Router.
Before starting your broadband setup
- Make sure that your broadband service is enabled.
- Make sure you remove any previously installed broadband equipment from your Mac
- Your broadband username and password. We send you this in an email when your broadband service is activated. Note that your username is different from the one you chose for your account. See our Broadband Settings page for more information.
Fitting microfilters
Plug the microfilters into your broadband-enabled telephone socket. Microfilters stop any interference from other telephone equipment affecting your broadband service. For more information read our
Guide To Fitting Microfilters.
Important: Take care extra when plugging your microfilters in. Microfilters plugged into the wrong places are a common cause of broadband faults. Your broadband hardware should
always be plugged into a microfilter. If you have any equipment attached to extension sockets on the same line, they should also be plugged into a microfilter.
Hardware Setup
- Connect your microfilter to your broadband enabled telephone line. You should also connect a microfilter to any extension on this line that is in use. This includes extensions used with fax machines, alarms or satellite equipment.
- Connect the power supply to your router and plug the power supply into an available power socket.
- Connect your Mac to the Voyager 2110 Router using the yellow Ethernet cable. One end attaches to the Mac's Ethernet port, the other to the Voyager 2110's Ethernet port.
- Turn on your modem.
Network settings
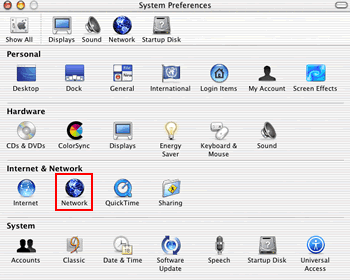
- From the Apple menu, click System Preferences. Click Network.
 |
|---|
System Preferences |
|---|
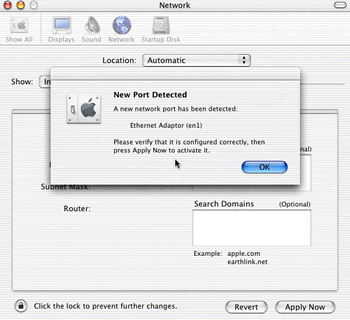
- The 'New Port Detected' window may open. If so Click OK.
 |
|---|
New Port Detected |
|---|
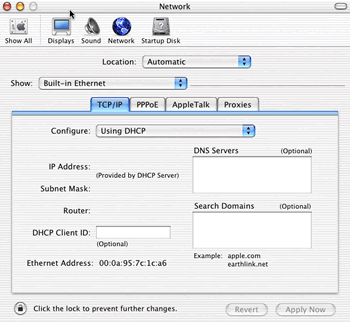
- On the Network settings screen select Built-in Ethernet from the Show drop-down menu.
 |
|---|
TCP/IP settings |
|---|
- Select the TCP/IP tab . Click on the Configure drop-down menu and select Using DHCP.
 |
|---|
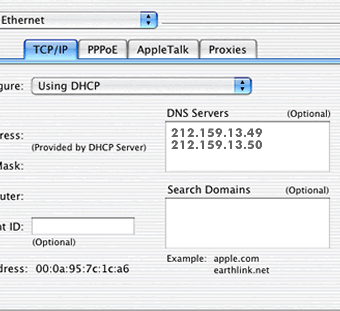
DNS settings |
|---|
- In the DNS Servers box enter the Plusnet DNS Addresses:
Primary DNS - 212.159.13.49
Secondary DNS - 212.159.13.50
- Click Apply now and close the window.
Router Setup
- Open your web browser, such as Safari. Type in the following into the Address Bar - http://192.168.1.1 then press Enter.
- The Configuration Manager will open, prompting you for a username and password.
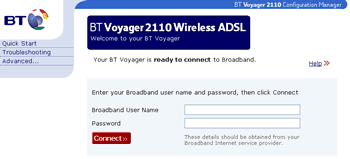 |
|---|
Username and password |
|---|
Enter your broadband username and password.
Your username will take the following form:
Broadband Username: username@plusdsl.net
Password: same as your normal account password - Click Connect. The Voyager 2110 will now connect you to the Internet and the Quick Start screen will change to show your connection status. You can use the Disconnect button should you wish to go offline at any time.
You can proceed to setup the routers wireless connectivity. Please ensure that you use the routers built-in wireless security features.