Turn on suggestions
Auto-suggest helps you quickly narrow down your search results by suggesting possible matches as you type.
Showing results for
Email setup: Mozilla Thunderbird
Email setup: Mozilla Thunderbird
Topic Options
- Subscribe to RSS Feed
- Mark as New
- Mark as Read
- Bookmark
- Subscribe
- Printer Friendly Page
- Report to Moderator
- Plusnet Community
- :
- Library
- :
- Email setup: Mozilla Thunderbird
Email setup: Mozilla Thunderbird
16-09-2014
5:29 PM
Follow these instructions to set up your Plusnet or hosted domain email address.
- If this is the first time you've opened Thunderbird, the Mail Account Setup window will appear automatically (continue to step 2).
Otherwise, go to File on the top bar and select Existing Mail Account...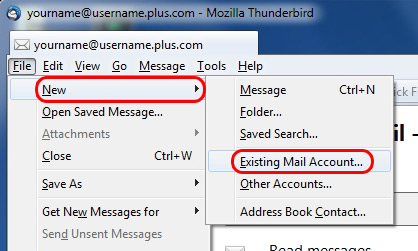
Fill in your name, email address and password. If you need help with these, there's more information below the screenshot.
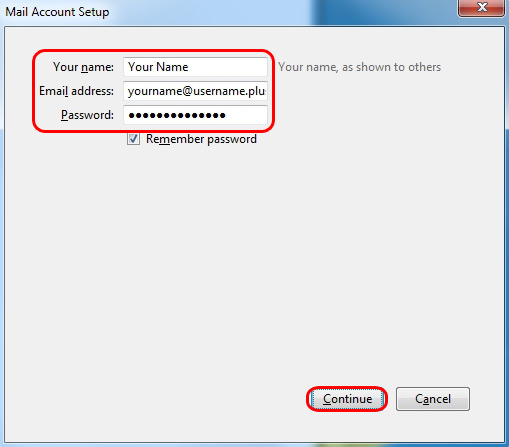
- Your Name: Enter your full name (or the name you'd like people to see when you send them email from this account)
- Email Address: Enter the address you're setting up, this could be a Plusnet address (yourname@username.plus.com) or a hosted domain address (yourname@yourdomain.co.uk)
- Password: Enter the password for the email address you're setting up (I don't know what this is)
When you've done this, click Continue.- Now Thunderbird will try and detect your mail settings. This won't work so you'll need to enter them yourself (see below the screenshot if you need help with this).

- Incoming: Choose POP3 or IMAP from the dropdown box (I don't know what to choose)
- If you chose POP3, enter mail.plus.net
- If you chose IMAP, enter imap.plus.net
- Outgoing: Enter relay.plus.net (if you've set up a Plusnet email account before you'll be able to choose it from the dropdown list)
- Username: Enter the username for the email address you're setting up (I don't know what these are)
Make sure the rest of the settings (Port, SSL, Authentication) are set to Auto or Autodetect as shown in the screenshot above. When you're finished, click Re-test. - Incoming: Choose POP3 or IMAP from the dropdown box (I don't know what to choose)
- Thunderbird will take a minute to check the settings you've entered.
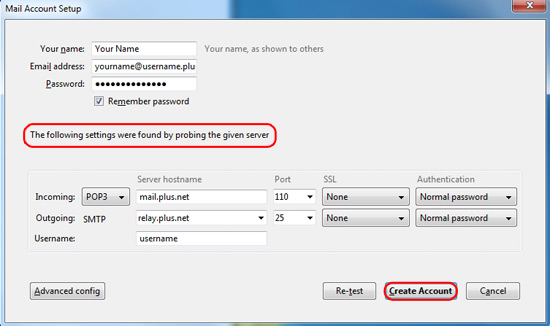
- If your settings are correct, it'll say The following settings were found by probing the given server or Thunderbird has found the settings for your account, click the Create Account button and move to the next step
- If there's a problem, make sure your settings match the screenshot in step 3 and click Re-test
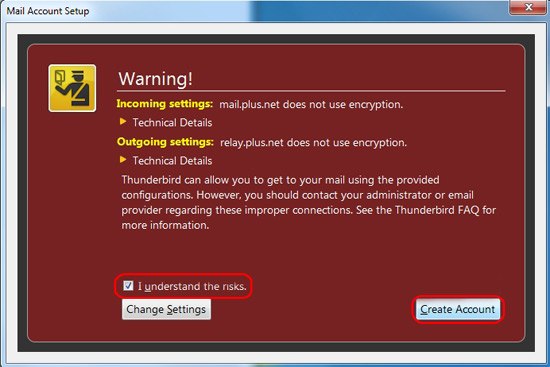
- You'll see a warning screen like the one below, unfortunately our mail servers don't support encryption (we're looking into launching this feature) so to continue you'll need to tick I understand the risks and click Create Account.
- Click Tools on the top bar and select Account Settings.
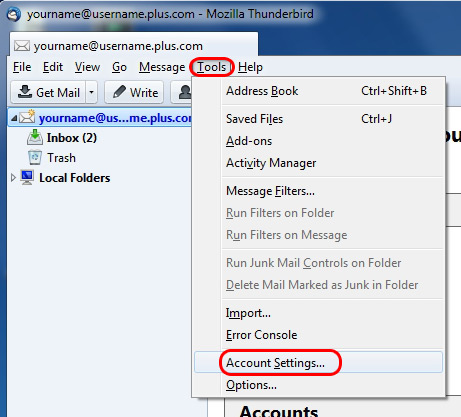
- Select Outgoing Server (SMTP) on the left hand menu, choose the default SMTP account (relay.plus.net) and click Edit on the right hand side.
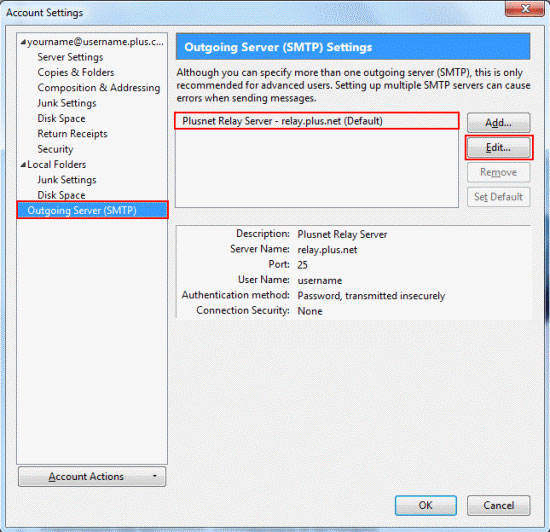
- Make sure the settings match those shown underneath the screenshot.

- The Server Name should be relay.plus.net and the Port should be 25
- Make sure Connection Security is set to None
- Change Authentication method to No authentication (this will grey out the User Name box, so you can't edit it)
Click OK once you've finished entering these details. - That's everything you need to do, click OK again to finish.
Click Get Mail and your email will be downloaded to your Inbox.
That's all you need to do. If you have any questions about your email service or you experience any problems, please see the Related Articles at the bottom of the page.