Turn on suggestions
Auto-suggest helps you quickly narrow down your search results by suggesting possible matches as you type.
Showing results for
Creating A Website Using Nvu
Creating A Website Using Nvu
Topic Options
- Subscribe to RSS Feed
- Mark as New
- Mark as Read
- Bookmark
- Subscribe
- Printer Friendly Page
- Report to Moderator
- Plusnet Community
- :
- Library
- :
- Creating A Website Using Nvu
Creating A Website Using Nvu
11-05-2009
10:46 PM
This tutorial will show you how to create a website using Nvu, a free to download website creation tool. Read our 6
Steps to Website Success article, which will help you create a better website.
The tutorial is split into 5 sections.
- Plan what you want to say - don't start without knowing
roughly what you want to say - Create a page template - create a template that will
speed up your work - Create your homepage- create the first page of your site
- Create more pages - tips on adding more pages
- Uploading your pages - transfer your pages onto the World Wide Web.
A. Plan what you want to say
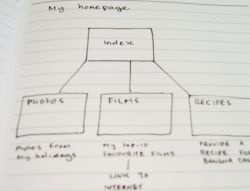
Before you start creating your homepage draw out on paper what you want to say. A little bit of time spent planning will save you from wasting time building things you find you don't need.
- How many pages do you need?
- How will these pages link together?
- Will you need pictures?
 |
|---|
Plan your site |
B. Create a page template
Rather than building all your pages from scratch, create a template. This will help you keep you keep the pages on your site looking consistent, and will also save you time.
We use a program called Nvu in our example, you can download Nvu for free - http://net2.com/nvu/download.html
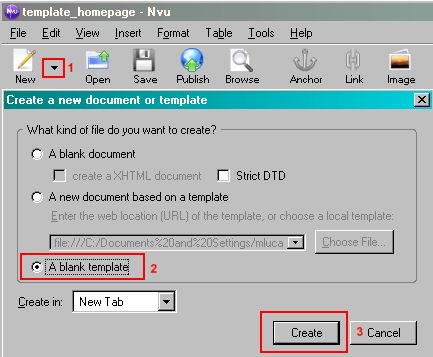
- Open Nvu. Click on the arrow next to New and select More options. From the Create a new document or template window, select A blank template. Click Create.
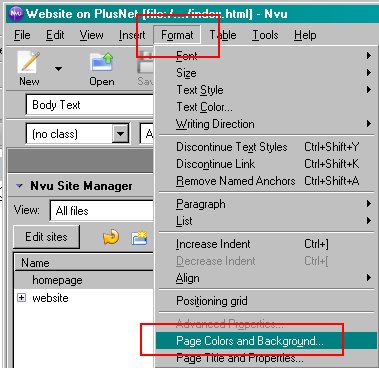
- Your blank template is now open. It's time to format your template, this will help set the style of your website. You can miss this step out if you are in a hurry, but it's good to give your site some personality.Format the background and test colour by clicking on Format, and then click on Page Colours and Background.
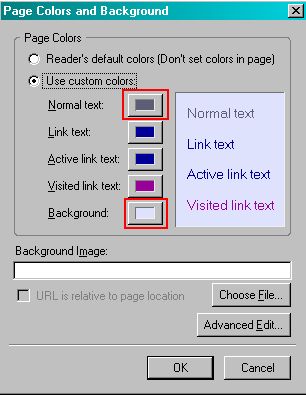
- Click on Use custom colours and click on each colour box you wish to customise. Make sure that your page is easy to read by using a contrast between your background and text colours. It's best not to use colours that are too bright, or that clash. Have a look at your favourite websites for ideas about colour combinations. Click OK when you have finished setting your colours.
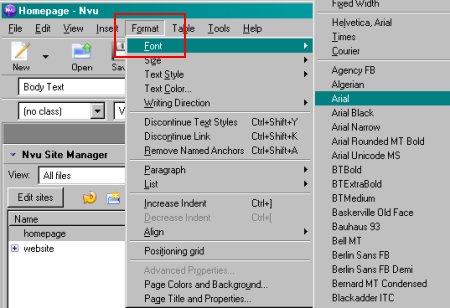
- Next change the style of your text. Click on Format, then click on Font. The range of styles available will depend on what you have installed on your computer. It's best to use a font that is easy for people to read. If you want your website to stand out, don't use the default font.
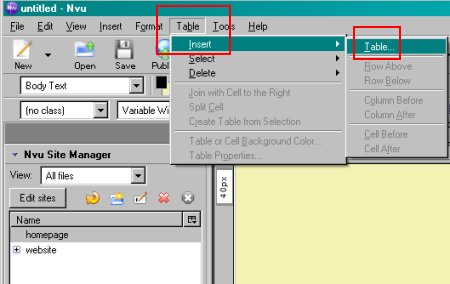
- The next thing we need to do is create a layout for your template that will determine how pages will be arranged. One way to do this is to use a hidden table that will space out your page elements.Click Table, click Insert and then Table.
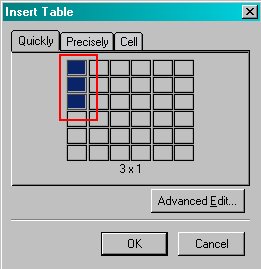
- Drag your mouse to highlight one column and three rows as indicated below. Click your left mouse button to select. A table will appear on your page that has three rows and one column. We will use the top row for the page title and the second row for our links and page content. The bottom row will be used for a footer.
- You will see the table in your 'normal' window. Double-click on the border of your table. A Table Properties box will appear. Set the Border to 0 to make the table border invisible. Set the Table alignment to Centre.Note that measurements on websites can be given either in pixels (picture elements, the individual dots of light that make up your screen) or as a percentage of your page. Working with pixels provides precise control, while working with percentages allows your elements to stretch as the browser window is resized.
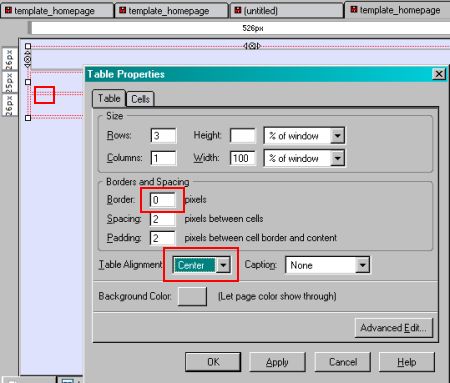 Edit the Table Properties
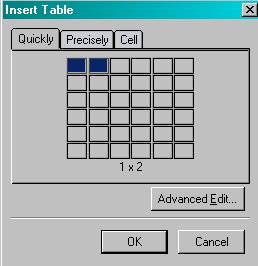
 - Next we will create a separate space for the menu, and the page content. Click on the middle row of the table and Insert a new table. This time make it 2 columns and 1 row. Again set the border as 0.
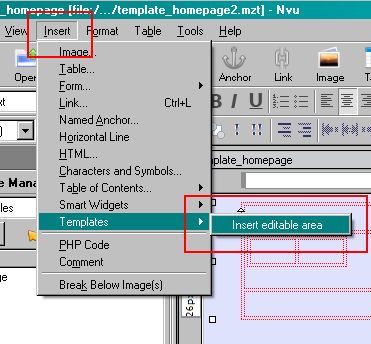
- Now we will insert some page elements - an editable section for the page title and the page content, and the footer and page menu.Click onto the top row of your table. Click Insert, then Templates, then Insert Editable Area. Call the area 'pagetitle', then click OK. Click on the right hand cell of the middle table and call the editable area 'content'. For this last area, change the area type to Block.
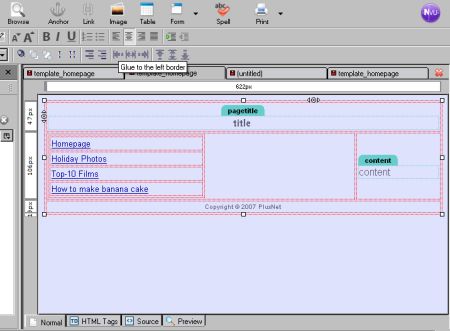
- Next we will put a navigation bar in place. Click on the left hand column of the centre row and insert another table. Using the actions in step 5 to 7, give your table one column and a row for each page you want to include on your website.
- On each line of your menu table type in the name of each page. In this example I have created 4 page links, Homepage (which is the page visitors will first see when they arrive), Holiday Photos, Top-10 Films and How to make banana cake.
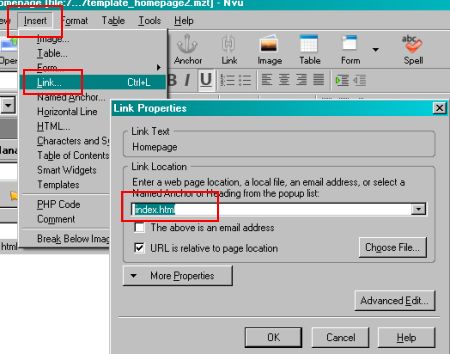
- To turn these page names into links that visitors can click on we need highlight the letters of each page name in turn and click Insert > Link.Your homepage file should be called 'index.html', while your other pages can be given simple names that relate to what they are about. Important tip - when naming files, don't use capital letters or spaces, and only use letters and numbers.
 Insert > Links >
Name your page files - Click on the bottom row and add some footer information that you want to appear on each page. This might be your contact email address or copyright information.
- Click on File > Save As and call your template 'homepage_template'.
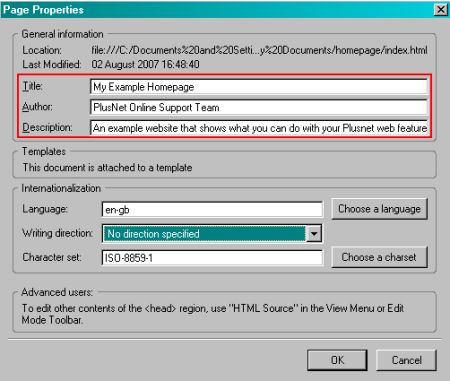
- We will now give your homepage a title. Click on Format > Page Title and Properties. Choose a Title for your homepage, this will appear on the top bar of your browser, not on the page itself. You can also write Author details and a Description, which will help people to find your website.
- You have now completed your page template. This template can be used as the starting point for all the pages of your website, saving you lots of time, and helping to keep everything looking consistent. You can proceed with the next section - C. Creating your Homepage.
 |
|---|
New > More options > A blank template |
 |
|---|
Format > Page Colour and Background |
 |
|---|
Choose your page colours |
 |
|---|
Choose your page font |
 |
|---|
Table > Insert > table |
 |
|---|
Create a single column, three row table |
 |
|---|
Insert table |
 |
|---|
Insert > Templates > Insert editable area |
 |
|---|
Template complete |
 |
|---|
Page Properties |
[TOP]
C. Create your Homepage
In section B we created a template file. Now we are going to use the template to create our Homepage. This is the first page which appears when you visit a website. It usually welcomes the visitor and tells them what kind of things they can expect to find on the website.
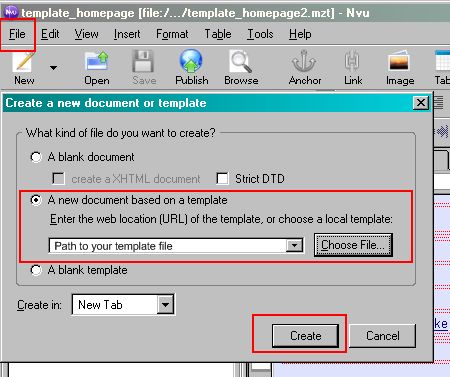
- First click File then New. Select 'A new document based on a template' and select the file you saved at the end of Section B - Create a page template.
- Save the file with the name 'index.html'.
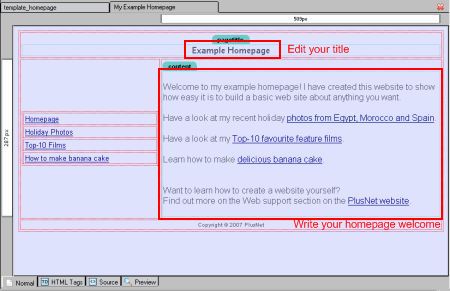
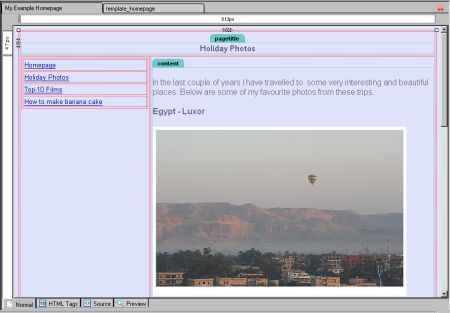
- Now we can start to add our content. Start by giving the page a title, change the pagetitle text to whatever you want to call your homesite.
- In the content box write your greeting. This is your chance to greet your visitor and tell them about what they will find on your site. You might want to write a brief explanation of what a visitor will find on the pages of your website. You can add more links, using the same method shown in Step 12 of creating your homepage template.
- You've now created your homepage! Save the changes you have made. Click File > Save. You can come back and add more refinements using things you learn in the next section..
 |
|---|
File > New > A new document based on a template |
 |
|---|
Write your homepage content |
[TOP]
D. Create more pages
You can now create all the other pages for your website using the same basic steps that were used for creating your homepage.
- First click File then New. Select 'A new document based on a template'. Select the template file you created in Section B - Create a page template.
- Save the file with the name you want for your page. Remember, no spaces or symbols in the name, and don't use any capital letters.
- On this example page we will put some images on, which are really useful for making a website more visually interesting. To add an image, first make sure that you have a suitable image file, such as a JPEG or GIF format file. These formats tend to be smaller which makes them easier to download and quicker to display. You should also check that the image you want to use will fit onto your webpage.
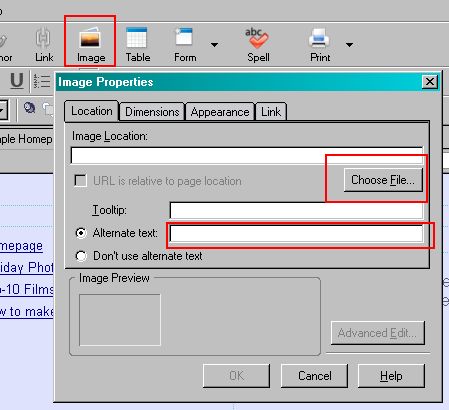
- Click on the point in the content box where you want to place your image. On the top button menu, click on Image and then Choose File.
- Make sure that you provide a description of the image, and write this in the alternate text box. This will appear if the image can't be viewed.
- Click OK to add your image to the page.
- Try adding additional elements. The sky's the limit, although for the first version of your website, you might like to keep things simple to begin with.How about adding a referral banner? You could save money on your broadband subscription if your visitors sign up with Plusnet. Read the My Referrals - Using Banners Tutorial.
 |
|---|
Image selection |
 |
|---|
Images in place |
[TOP]
E. Uploading your pages
When you have finished your pages, you can use Nvu to upload them to your website, without the need for an additional FTP program.
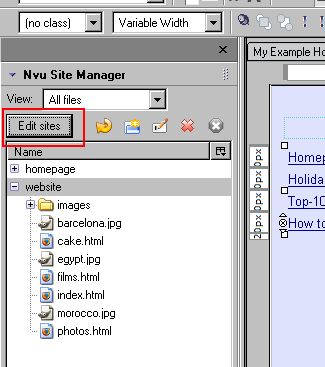
- On the Nvu Site Manager box, click Edit Sites.
- Click on New Site. Choose a Site Name.Fill in the following details:Web Site Information - http://www.(Your Username).plus.net
Publishing Server settings: ftp://ftp.plus.net/htdocs/
User name: Your account username
Password: Your account password
Click OK.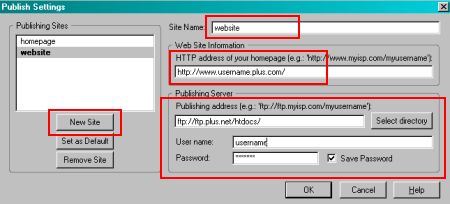 Publishing settings
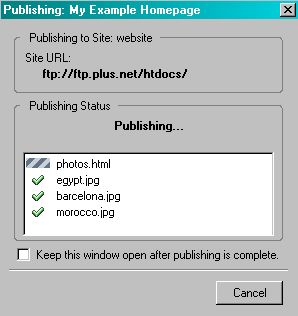
 - With your FTP details now set, you can upload each page by clicking File, then clicking Publish. If your files have been published successfully you will see a confirmation window, as shown below. If you experience problems uploading your files using Nvu's built-in FTP capability, you can always upload them manually using one of our FTP tutorials.
 |
|---|
Upload your files |
 |
|---|
Publishing window |
You should now have your own website. You don't have to stop there though! Read our 6 Steps to Website Success for more tips on improving your website.
[TOP]