Turn on suggestions
Auto-suggest helps you quickly narrow down your search results by suggesting possible matches as you type.
Showing results for
Setting up Plusnet email on an iPhone
Setting up Plusnet email on an iPhone
Topic Options
- Subscribe to RSS Feed
- Mark as New
- Mark as Read
- Bookmark
- Subscribe
- Printer Friendly Page
- Report to Moderator
- Plusnet Community
- :
- Library
- :
- Setting up Plusnet email on an iPhone
Setting up Plusnet email on an iPhone
28-07-2009
12:09 AM
Having email on the go is always really handy, but it isn't always immediately obvious how to set up your email on a number of mobile devices. Here I'll explain (with pictures!), how to set up your Plusnet email account on your iPhone.
***Please note - if this is the default mailbox on your account, the username for your email account will just be your account username. However, if it is an additional mailbox, then this will be "username+mailbox". For example, if I had an email address of community@jamesbailey.plus.com my username for this mailbox would be "jamesbailey+community"***
***Please note - if this is the default mailbox on your account, the username for your email account will just be your account username. However, if it is an additional mailbox, then this will be "username+mailbox". For example, if I had an email address of community@jamesbailey.plus.com my username for this mailbox would be "jamesbailey+community"***
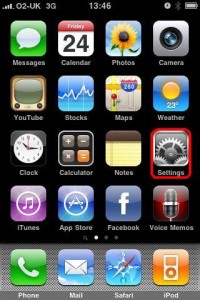
So let's start at the start. You'll need to kick things off by opening up your main menu screen and selecting the settings icon.
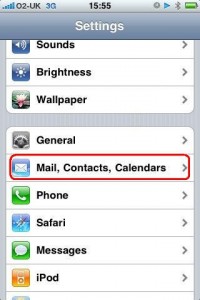
Then you'll need to select the "Mail, Contacts, Calendars" menu.
Then tap "Add Account".

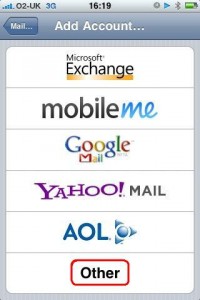
Then select the "Other" option when presented with a list of Email providers.
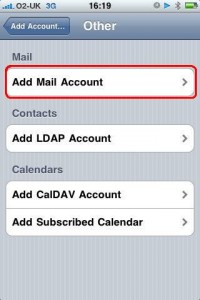
Then click on "Add Mail Account".
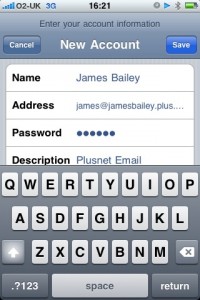
You'll then be asked to type in your name, email address, password and a name (description - which defaults to the email address) for your email account.
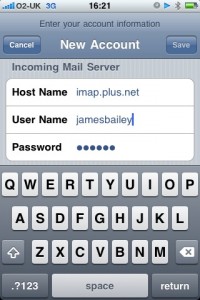
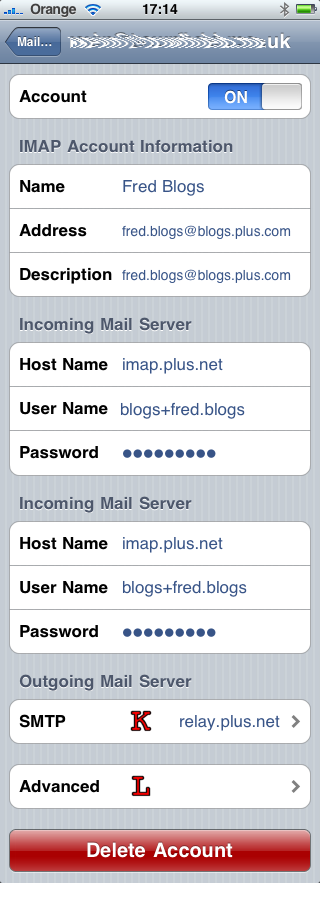
Once you've done that, click on the "Save" button and you're presented with another settings page. You'll see that you've already filled in the summary section, so now you'll need to fill in the incoming server information. So enter "imap.plus.net" as the incoming server name and then your username (the default for this is the same username that you use to log in to the Member Centre) and your password again. If you are using a subsidary email box, then use the user name for that mail box (e.g. jamesbailey+sally) and its own password.
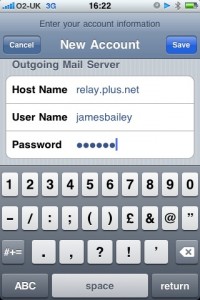
Now it's time for the outgoing server information. Again, pretty similar, but making sure you use "relay.plus.net" instead. If you are using a subsidary email the apply the same details as above - this avoids the necessity for you to share the password of the main account if the mailbox owner is not the account principle.
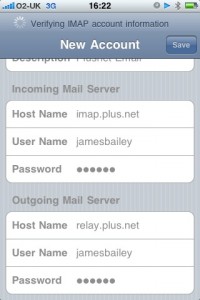
Once you've done that, you should see all the details of the server settings that you've just entered which should look a little bit like this. Then click on the "save" button".
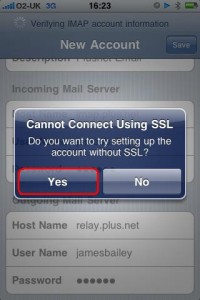
Your iPhone will then need a bit of time to think about apply your settings and you'll be presented with an SSL error, which you'll need to say "Yes" to. When I was setting up my account, I got asked this twice (once for each of incoming and outgoing servers), so don't worry if that happens.
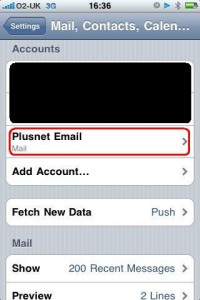
Then you should all be done! You'll hopefully be able to see your new mail account in the main email accounts window.
If things do go wrong, you'll need to go through all of the settings manually. The following screen shots show all of the settings required to get your iPhone working.
Account information:
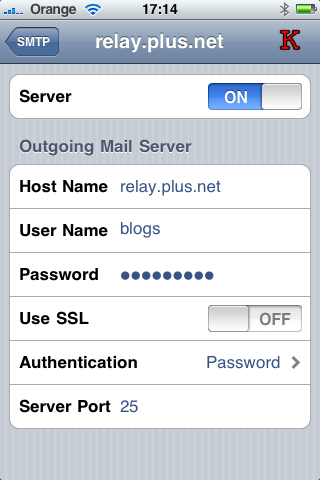
Outbound server information
[caption id="attachment_2502" align="alignnone" width="320" caption="Plusnet outgoing server settings"]
 [/caption]
Selecting the advanced options (L above) gives access to the IMAP advanced features which enable you to link the iPhone folders to the folders on your PN mail server.
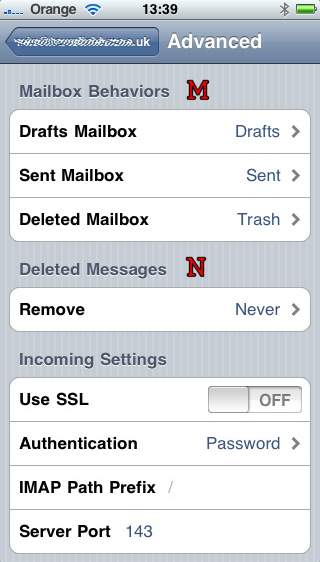
Remember if you leave the settings on the iPhone to REMOVE items from the server, they will not be available for down loading to your main computer, therefore in most cases, it will be more practical to configure the iPhone such that it never removes anything from the server. Email deletion can then be performed using your computer's email client or the Webmail interface.